

Congratulations!
The fact that you’re here means that you want to build your website or that you’re redesigning your existing one.
And it’s a fantastic decision because that means that I don’t have to tell you why it’s important how you will benefit from
- having your own platform to promote you – and only you – with no distractions;
- you’re not relying on a platform or profile as the primary source of traffic; or
- you’re ready to dive in and learn how to build it on your own without hiring a designer or a developer.
But if you’re really on the fence and you should read the preamble to this series here: Why you still need a personal website in 2024.
If you’ve read it already, let’s move on to the first in this series with imagery and photography.
Here’s what we’ll cover:
- Why it’s important and how it affects content retention;
- When to use stock photography and when it’s time to take your own or hire a photographer;
- Where to use it on your website for more impact;
- Basic SEO to optimize your site and increase traffic with your photos;
- How it affects user experience; and
- Bonus: the HTML and CSS code.
Why it’s important
It’s not a secret and likely doesn’t need much explanation, but I find that seeing and reading the actual words of an explanation can trigger an aha! moment of the oddest kind. Such as, Oh, I can use chopsticks to eat salad even though it’s not Japanese salad!
I told you it can be odd. Maybe I’ll explain it another day!
But, even so, I bet that as you read that sentence you stopped and thought about it for a split second, images coming up in your head. And the next time you’re eating salad it might even trigger a link to chopsticks.
Whether we are visual learners or not, we are still very visual people and we are constantly being stimulated. Effective images on your website will your customers to remember your words and your brand. It’s a full package. And since you’re a personal brand, seeing and knowing your face will connect your customer to a real person. The more often they see it, the more familiarity builds and the more familiarity builds, the more likely they’ll return to you for your expertise.
When people hear information, they’re likely to remember only 10% of that information three days later. However, if a relevant image is paired with that same information, people retained 65% of the information three days later.
So if you couple your words with the right image, you’ll bring back more return visitors than without.
When to use stock photography or your own
It’s a fairly simple rule of thumb that I follow.
If it’s a blog post I’m open to using stock photography because of the sheer number of options that are out there. Using stock photography can be faster than setting up my own shot especially when it’s something I may not be able to shoot, like a certain location or using things that I don’t own. But I’m very picky about the pictures that I use to make sure that,
a.) it represents the content that I’m writing as best as possible; b.) it’s doesn’t throw off the colors or aesthetic of my website even with the thumbnails; and c.) if and when I’m able to replace it with something better of my own, I will.
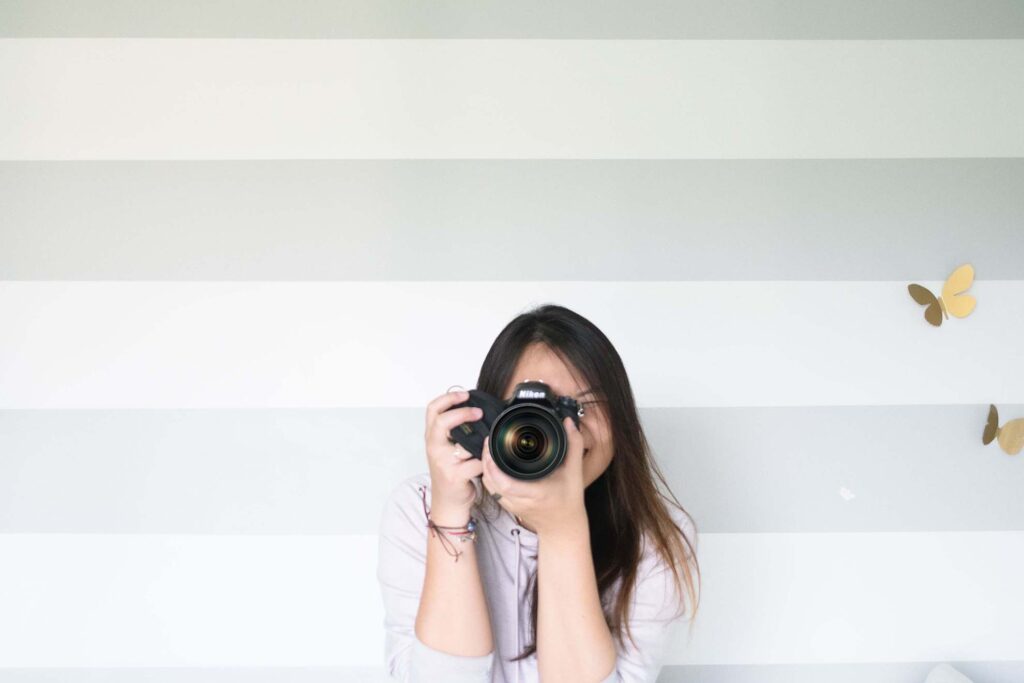
Now, it’s easy to say that because I’m also a photographer that it will come easier for me to take high-quality photos that stay on brand but the fact of the matter is that many times it comes down to how much time these options will take me. I really believe you have to choose one that will represent the content, your own or stock, as best as it can because it evokes emotion and triggers memories later. So if you can be smart and specific about your images, you’ll be right on track.
But if it’s your homepage, you should, 100% have a professional photoshoot – when you’re able to – to get your face and your name out there. You’ll do it for the ‘gram. Do it for your website because this is what you’ll get from the photoshoot especially if you hire a personal brand photographer specifically:
- Consistency in the images that are produced;
- Commercial licensing to all the images;
- Enough images for you to use on your website and Instagram if you plan well enough to get a variety of shots; and
- You won’t need to take as many of your own or learn how to edit (unless you really want to!).
The key component here, though, is consistency. Photos that are consistent speak a lot about your brand. So if it follows to your website there’s much more coherence and brand identity across different platforms.
However, if you can’t invest in that yet it doesn’t mean you have to wait to have a professional website!
Here are some tips to do it on your own regardless of the type of camera you have:
- Always, always, always find the right lighting. Especially if you’re using your phone. Make sure you have enough light to reduce graininess and low quality.
- Practice composition. Well-composed photos are what makes your brain go ‘ahhh, I like that‘. It’s innate and happens automatically when you see something that your brain likes. Make sure the images are properly composed and follow your aesthetic.
- Plan a few photos as you plan your content and head out for an afternoon with a friend.
- Take wide shots that leave room for text.
- If you use a filter, keep it the same filter and make sure it represents your brand.
Where to use it on your website
Well, this is where it gets fun!
Since content planning is next in the series, it seems a little counter-intuitive to focus on images when you haven’t written any content. But I believe images are a catalyst to great content and each play off of the other. So we’ll cover some ideas here and in the next post about content.
The first and most obvious is the header image of your website – and you really should have on. Unless your homepage is a blog page (and we’ll discuss this also in the next content post). It’s the first impression to your website and, more importantly, your brand. It’s a welcome mat at the door and the font, content, colors and image invites someone to stay and explore. Placement of the main subject in the image (*ahem* you) will be important since it affects where and how your content will flow.
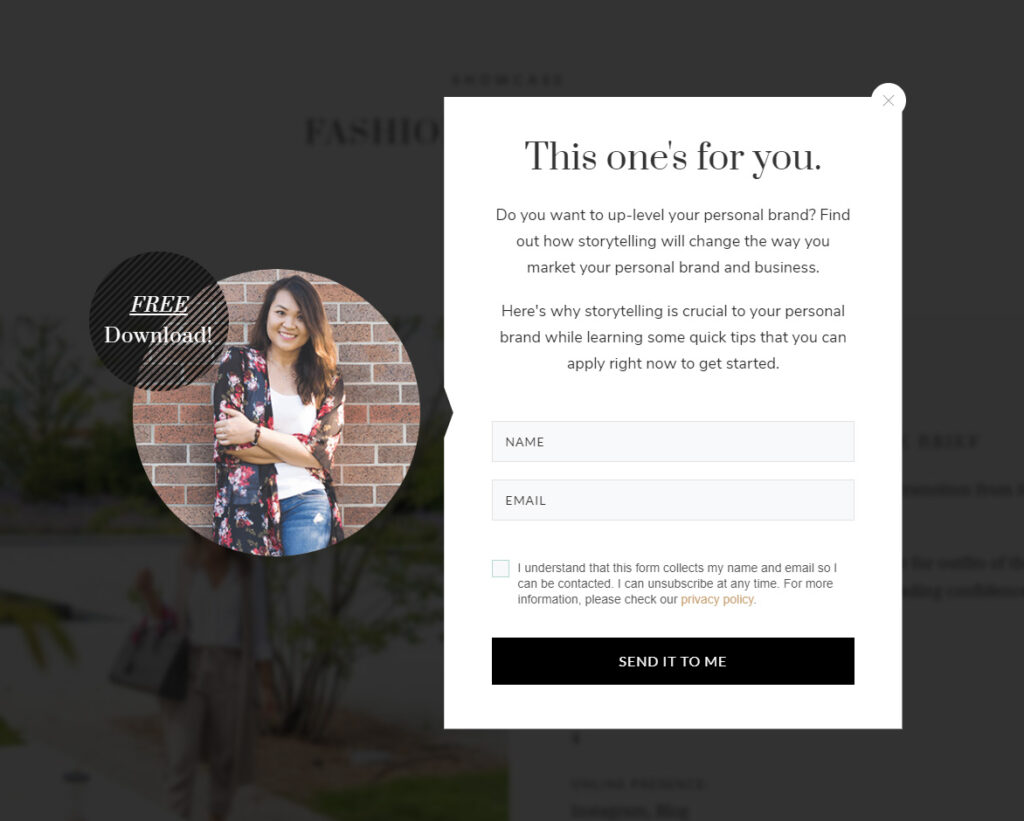
The second place you can use them in your website are pop-up forms and opt-ins. An image that represents the kind of message, download or free guide that you’re providing adds a nice touch and shows a bit more of your personality. It’s a place to make another impact to give them a gentle nudge to opt-in and stay connected.
The third place is for your blog, of course! Again, with your blog you can be more forgiving and mix it up with some stock photography. Just bear in mind the aesthetics and brand colors and this combination can really work for you. However, use the same app and the same filter consistently.
The fourth is more photos on your landing page! Once in the top section of your homepage is not enough and no matter what the industry your business is about, you need more photos that reinforce you and your brand.

Basic SEO to optimize and increase engagement.
And this is where it can get very involved but I’m going to keep it simple and easy. It’s very basic and foundational activities for image optimization for a website.
What image optimization means
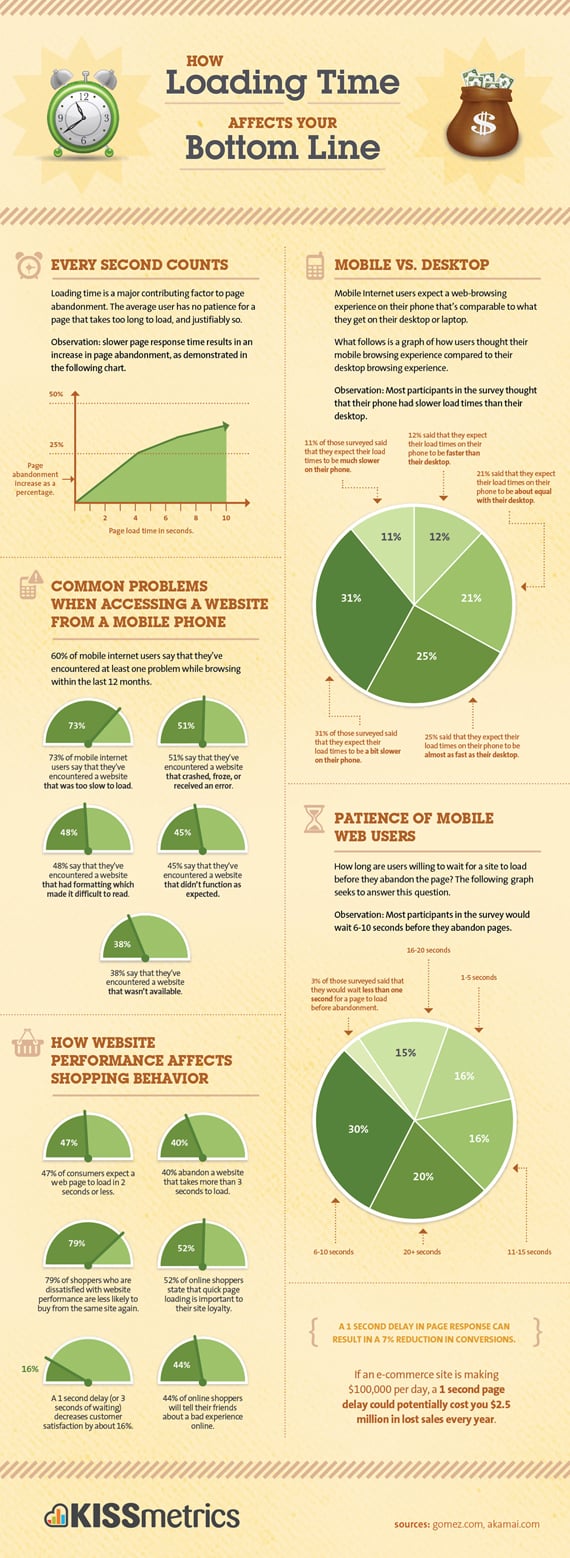
Image optimization is simply to make your images as digestible as possible for the type of device/browser that your customer will be consuming your content on. This means that the size of your image file matters – in KB, MB or GB. How many times have you waited for a page to load then abandoned it when it took too long and so you left or maybe even though it was broken?
You want to get the size of your file to be as possible and it’s possible to get a large image to be between 150 to 200 KB. Now, this does not mean that you need to reduce the dimensions – the width and the height – of your photo. When you use it for your website, you want it to be, at most 1500 to 1600px in width and let the height of the photo adjust accordingly.
Both the image size and dimension affects the resolution (the number of pixels) of an image. The lower the resolution, the grainier the photo, the less likely that you’ll use it as a large background image.
Optimizing your image means that it doesn’t require the user to download huge files that takes up either data on a phone or bandwidth on home internet.
That also means that your page will load faster and that’s crucial because:
A 1 second delay can result in a 7% reduction in conversions.
It can also hurt Google rankings.
So pay attention to making sure that your images don’t take forever to load and they’re still good enough quality for your website. Whether your photos are your own or from stock photography like Unsplash, you’ll download it at the highest resolution.
Here are some sites to help you with image optimization.
Image compression
- TinyPng – compression for .png files;
- TinyJPG – compression for .jpg files;
- Squoosh – compression for .jpg, .png, .svg, WebP files (build by Google);
Image ‘alt’ and ‘title’ tags
In most platforms and themes like WordPress or Squarespace there is a place for you to fill in the ‘alt’ (alternative text) tag or ‘title’ tag.
Both alt tags and title tags are searchable by Google and help your customer to find you through the images tab as you search. So spend some time filling it out!
It’s also the first step of making your site accessible. Like SEO, this is another very large rabbit hole you can go down, but the easiest and one of the most impactful things you can do is add descriptions to your alt tags and title tags. Any of your customers that use screen readers to surf the internet will be appreciative of it.
How images affect user experience
If we return to the analogy your website as a home, your website imagery is the artwork on the wall. It may contain you and your family, favorite city, nature or inspirational words. On your website, images affect the experience and leave an impression after they’ve left. Images will affect the user’s interaction and provide meaningful and relevant experiences.
I’d like to invite you to think back to a time you had a really awesome bathroom experience. It might be at someone’s house. It might be a restaurant. Take notice of how your experience was – what do you see, smell and feel? Was there a beautiful painting or a large mirror? Were there dedicated towels to use per person? Was there an area for you to freshen up and check your appearance before you stepped out the door?
If you’ve had an experience like that, think about how you can apply it to your website. What would you like your audience to see, feel and, through imagery, even smell? Was it easily accessible?
These details are what makes the user experience a nuanced but incredibly important part of digital media.
If you return to thinking about it from a business standpoint, great user experience keeps them on your site longer, moves them through the funnel you set and will keep them as returning customers.
So bust out the camera, leave the fear aside and step both in front and behind the camera!
Homework
If you’re just starting a website:
- Start a mood board (physical or on Pinterest) with images that fit your brand
- Notice the color schemes
- Choose a variety of shots that have space for text
- Write down the commonalities and themes between the images and the words you would describe them (this can help with your alt/title tags and further clarify your intent with imagery)
- Take some photos to practice composition and editing with your favourite image editor (ie. Snapsneed, Lightroom Mobile)
- Find a friend that can help you to take some photos of you
If you already have a website:
- Go back and review if your images are optimized
- Go back and check if your website has alt/title tags
- Note the current images that you have
- What are the commonalities/themes/words you would use to describe them?
- Note the colors and composition
- Start (or continue!) your brand mood board to include what you’ve noticed and what you want your images to represent
As always, don’t hesitate to leave a comment below, connect with me on Facebook or slide into my DMs on Instagram and remember to sign-up to get the next step on how to build your personal website in your inbox.
